I keep trying to ignore Windows XP on this site. After all, the SuperSite for Windows is dedicated to the future of Windows, and let's face it, XP is the past. But a couple of thing prevent me from doing so. First, and most obviously, XP refuses to die, and like "Jason" from the Friday the 13th movies, it keeps getting another reprieve. Second, with Microsoft using a virtualized version of XP as the basis for its XP Mode compatibility solution in Windows 7, it's clear that many Windows users, especially those in businesses, will continue dealing with XP even if they've upgraded to Microsoft's latest OS.
For this site specifically, my XP slipstreaming guides continue to be among the most popular articles I've ever written. This is particularly amazing when you realize that my XP slipstreaming articles--indeed, my entire collection of articles about XP--is no longer even linked to from any live portion of the site (you can, however, manually view the various Windows XP-oriented reviews and other articles if you know where to look.)
Anyway. I promised I'd provide a simpler, ImgBurn-based slipstreaming guide for Windows XP and SP3. This is it.
I first covered slipstreaming on the SuperSite nine long years ago, for Windows 2000, the first Windows version to support this functionality. Not surprisingly, the process hasn't changed much and the end result is still a version of the Windows Setup CD that's been integrated with the latest updates. (Microsoft promises a more elegant method of slipstreaming with Windows Vista, but was pushed back to Vista SP2, and we're still waiting to find out what happened there.)
As a brief refresher, slipstreaming was originally designed to help Microsoft's corporate customers integrate the latest updates into their network-based OS install images so that they wouldn't have to waste time deploying an OS image to multiple PCs only to later have to wait around while enormous numbers of updates were installed. With slipstreaming, you can keep an OS image reasonably up-to-date and keep post-install updates to a minimum. And for whatever its worth, Microsoft uses this process to create updated integrated installation media of its own each time a Windows service pack is released.
Of course, what I'm documenting here will be of interest primarily to individuals and, perhaps, small businesses that don't have access to Microsoft's volume licensing programs whereby they would receive up-to-date install media on an ongoing basis. And as anyone who has installed Windows XP with Service Pack 2 (SP2) in the last year or so can tell you, there's nothing like the monotony of installing the OS and then having to install 100+ more updates over multiple reboots. It's just not right.
But integrating your Windows XP Setup disc (any version works: The original XP, XP with SP1, or XP with SP2) with SP3 will make everything OK, at least the next time you do a fresh OS install. And instead of 100+ updates to install after the OS install, you'll just have a handful. (Though that number will of course continue to go up over time.)
Disclaimer: These instructions are provided as-is, and I'm no longer interested in troubleshooting this procedure. Understand that you proceed at your own risk. Be sure to fully backup everything on your system before wiping it out and reinstalling, whether with an integrated XP SP3 disc or otherwise. Understand that you will need to abide by Microsoft's production activation requirements and that these technologies could require you to activate XP by phone after an OS reinstall. Be prepared to go back to your previous XP Setup CD if things don't work out. If you go into this with the right frame of mind, the worst case scenario is that you have to install a fresh copy of XP and then immediately install SP3 afterwards. That's not too horrible.
This time around, I'm only providing one set of instructions, involving only freely available tools you can readily find online. Here's what you need to make it work.
A Windows XP Home or Professional Setup CD. You can slipstream virtually any version of Windows XP, including the original version (build 2600), XP with SP1, or XP with SP2. It must be a retail Setup CD or a retail-like Setup CD (You may have luck with OEM CDs from PC makers as well, depending how much the company changed the disc layout.) Full or Upgrade CDs work just fine. Previously splipstreamed discs are fine as well.
Windows XP Service Pack 3 Standalone Installer. This 316 MB file is now available from the Microsoft Web site.
A Windows XP boot sector file. In previous versions of these instructions, I had you extract this file from your Windows XP Setup disc. But that requires yet another tool. Instead, just download one (wxp10.zip).
ImgBurn. This is an excellent free utility for disc burning.
ImgBurn project file. ImgBurn needs to be configured correctly to burn a bootable, slipstreamed XP with SP3 Setup disc. While we could laboriously step through the configuration changes you'd need to make, I am instead providing an ImgBurn project file (ZIPped, so extract it) that makes these changes for you.
Be sure to download the XP SP3 standalone installer, XP boot sector file, ImgBurn, and ImgBurn project file, and then install ImgBurn, before proceeding.
OK, let's start slipstreaming.
Open the My Computer (in Windows Vista or 7, Computer) window and navigate to Tools then Folder Options. In the Folder Options dialog, navigate to the View tab and select the option titled "Show hidden files and folders." Then, uncheck the option titled "Hide protected operating system files (Recommended)." (Dispense with the Warning dialog that appears.) Click OK to close the Folder Options dialog.
Insert your Windows XP with SP2 Setup CD in the optical drive of your PC and close any auto-run window that appears. In My Computer (or Computer), right-click the optical drive and select Open. Leave the window open with a view of the contents of the Windows XP Setup CD.
Open My Computer again. This time, navigate to the root of the C: drive or another location to which you'd like to save the files you'll eventually integrate with SP3. Create a folder named xp (as in C:\xp). Then, create a second folder named sp3 (as in C:\sp3).
Now, drag and drop the contents of the XP Setup CD into the C:\xp folder.
Now, you need to extract the SP3 files. While the files are copying between the two locations, copy the Windows XP SP3 standalone installer (typically windowsxp-kb936929-sp3-x86-enu.exe in the US) to C:\sp3. Then, open a command line window (Start, Run, cmd in Windows XP; in Vista, just open the Start Menu and type cmd in Start Menu Search).
Then, using the following commands exactly, navigate to C:\sp3 and extract the files (Note that the text [ENTER] means hit the ENTER key):
cd \ [ENTER]

  cd sp3 [ENTER]

  windowsxp-kb936929-sp3-x86-enu.exe -x:c:\sp3 [ENTER]
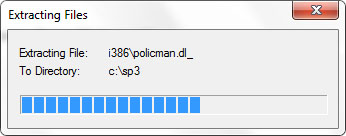
An Extracting Files dialog will come up and display the progress.
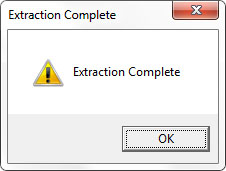
When the extraction is done, the following dialog will appear. Press OK to continue.
Note: Leave the command window open. You'll need it for Step 4.
Locate the
ZIP file (wxp10.zip) that contains the XP boot sector file and extract it. Navigate to the appropriate location, depending on whether you are slipstreaming Windows XP Home or Professional:\wxp10\cds\wxphome\files
\wxp10\cds\wxppro\files
Inside, locate the file w2ksect.bin. Copy this file to the root of the C: drive.
You should now have a folder, C:\xp, that contains the contents of your existing XP Setup disc, a folder, C:\sp3, that contains the extracted contents of the SP3 standalone installer, and a boot sector file, C:\w2ksect.bin. You're now ready to slipstream XP with SP3.
Now, type the following in the command line window (where [ENTER] means hit the ENTER key):
cd i386 [ENTER]

  cd update [ENTER]

  update.exe /integrate:c:\xp [ENTER]
Warning: If you are trying to slipstream a volume license version of Windows XP Professional from Windows Vista, the preceding steps need to be run as an administrator. To do so, right-click on the desktop and choose New then Shortcut. In the Create Shortcut dialog, paste in the following bolded text: C:\sp3\i386\update\update.exe -s:c:\xp\. Then, click Next, give the Shortcut a name, and click Finish. Run the shortcut by right-clicking it and choosing Run as administrator. Then proceed normally. (Thanks to John Straffin for the tip.)
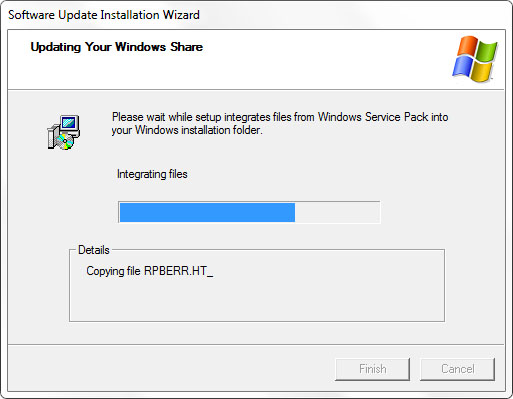
The Software Installation Wizard will appear and integrate the SP3 files into the XP with SP2 install files.
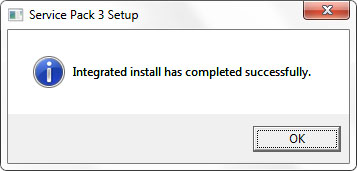
When the integration is complete, you'll see the following dialog. Click OK to continue.
Close the command line window. (Type exit and then tap Enter.)
Now it's time to make the bootable XP with SP3 Setup CD. Open ImgBurn and choose Mode and then Build from the menu.
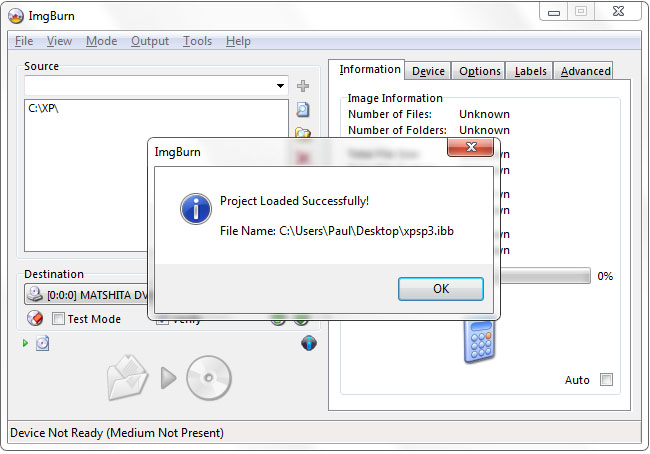
Then, click File and then Load Project. Browse for the xpsp3.ibb file you previously downloaded and click Open. ImgBurn will note that the project has loaded successfully. Click OK.
Note: If you changed the locations or names of the C:\XP and XP boot sector file, you will have to hand-edit xpsp3.ibb to match. This file is really just a text file, so you can open it and edit it with Notepad.
In the Source section, click the yellow "Browse for a folder" button and point it at C:\XP.
Insert a blank, writeable CD in your PC's optical drive. When the disc has been read, the Build button in ImgBurn will be enabled (it resembles XP-style folder and CD icons, with a green arrow in the middle). Click the Build icon.
ImgBurn will begin preparing the image to burn. If you see the following warning, click Yes.

After you verify the project to be burned, ImgBurn will begin writing the disc.
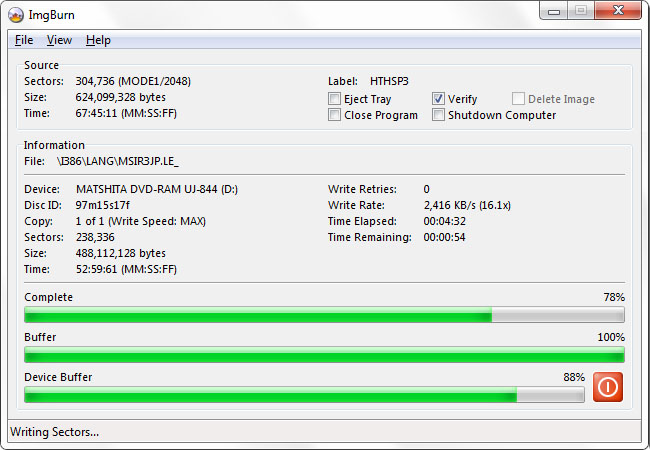
When ImgBurn completes burning and validating the disc, you're good to go: You can install XP with SP3 on a PC, or in a virtual machine, and make sure it works correctly.
I hope that these are among the last words I have to type about Windows XP. More important, however, I hope these are also among the last words I have to write about slipstreaming. If Microsoft is able to make Windows slipstreaming as simple as Office slipstreaming, articles like this will no longer be necessary. And that's a future I think we can all look forward to.
--Paul Thurrott
May 21, 2009
