Slipstreaming Windows XP with Service Pack 2 (SP2)
It's been a while since I've covered slipstreaming, or combining, a service pack into Windows, but the release of Windows XP Service Pack with Advanced Security Technologies (hereafter referred to as SP2) warrants some discussion. That's because XP SP2 is a huge change from the original shipping version of XP, offering as many new features and capabilities as a major new Windows version. For this reason, many people are going to want to install XP SP2 directly the next time they install Windows, and skip the time-consuming and potentially insecure step of installing the initial XP version first, and then applying SP2 after the fact.
But what, exactly, is slipstreaming, you ask? Back when Microsoft was developing Windows 2000, the company decided to create up a more elegant way of integrating service packs and other fixes back into the core OS, so that enterprise customers could always maintain an install set of the latest version of Windows, ready to be installed at any time on new machines. In the NT days, this process was convoluted at best, and service pack installs often required users to reinstall components that had previously been installed. It just wasn't elegant, but Windows 2000 fixed all that, and in XP the slipstreaming process is largely unchanged.
For end users, slipstreaming can also be useful. For example, you can copy the installation directory from your XP CD-ROM to the hard drive, slipstream the XP SP2 files into that installation directory, and than write it back to a recordable CD, giving you a bootable copy of the XP setup disk that includes SP2 right out of the box (so to speak). That's the process we're going to examine here. And slipstreaming isn't limited to service packs, either: You can also slipstream in various product updates, including hot-fixes. Previous to the release of SP2, I created a bootable XP CD that included the original "gold" version of XP, Service Pack 1a, and the Security Rollup 1 update, all meshed together into a single install. Now, I've tossed that CD aside for one that includes XP SP2 instead. Let's take a look at how I did this.
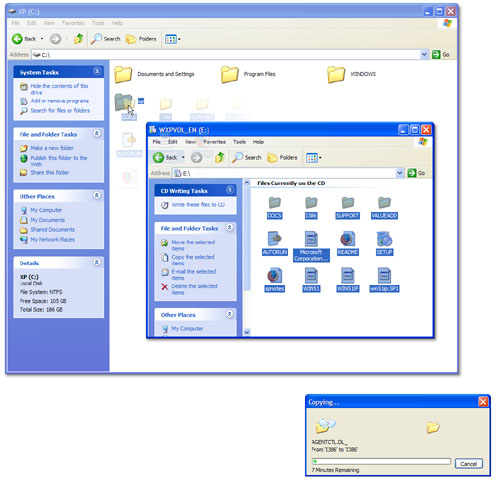
Step 1: Copy your XP CD-ROM contents to the hard drive
First, you need to find your Windows XP CD-ROM (any bootable and/or retail version; including Full and Upgrade versions; XP Home or Pro "gold" release) and copy the contents of the CD to your hard drive. Create a folder in the root of your C: drive called xp (C:\xp) and use My Computer to simply drag and drop the files between the two locations.
Step 2: Get XP SP2
While this is copying, obtain the Full Network Install version of Windows XP Service Pack 2 (272 MB), which you can download from the Microsoft Web site or copy from the Windows XP SP2 CD-ROM. The download version of this file is named WindowsXP-KB835935-SP2-ENU.exe, while the CD version is called xpsp2.exe. However, both are identical, save for the name. For this reason, I will refer to the simpler xpsp2.exe below, but you can substitute WindowsXP-KB835935-SP2-ENU.exe for that (You can also rename WindowsXP-KB835935-SP2-ENU.exe to xpsp2.exe if you'd like). Now, create a new folder called sp2 on the C drive (C:\sp2) and then copy this file to that location.
Step 3: Combine XP with SP2
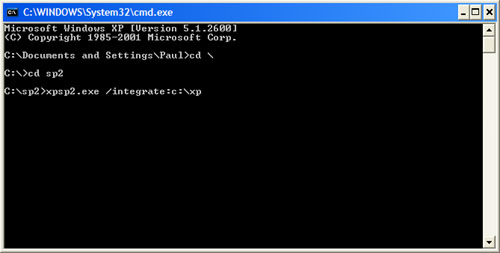
Now, you need to bring up a command line window by navigating to Start, and then Run, and typing "cmd" (no quotes); then hit ENTER. In the command line window, type the following (where [ENTER] means hit the ENTER key):
cd \ [ENTER]
cd sp2 [ENTER]
xpsp2.exe /integrate:c:\xp [ENTER]
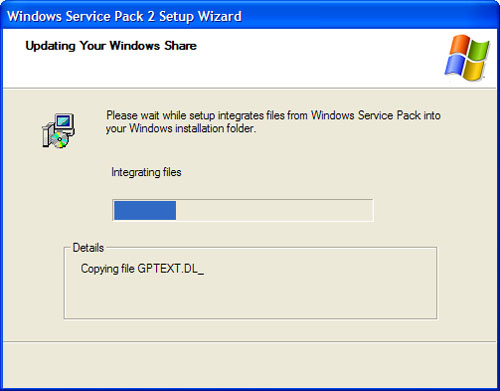
First, an Extract dialog box will come up and extract the files contained within xpsp2.exe. Then, XP SP2 Setup will combine, or slipstream, the SP2 files into the XP install, as shown in this figure:
 3
3
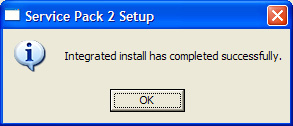
When it's completed, you'll see this dialog box. Click OK, and then close the command line window. If you don't see this dialog, you've done something wrong. Ensure that the command line entries you've used are correct.
Step 4: Extract a file needed to make your new CD bootable
Before we simply burn the resulting file set to a CD, we need to make sure we have a hidden file found on your XP CD-ROM that will make your new CD bootable. We can't grab this file with My Computer, but will instead use a shareware tool called ISOBuster, which you can find on the Smart Projects Web site. The latest version at the time of this writing is 1.6.
After you download and install ISOBuster, choose to use only the product's free functionality, unless you decide to purchase it, which wouldn't be a bad idea. The ISOBuster UI will resemble the following (assuming you've left your XP CD in the CD-ROM drive):
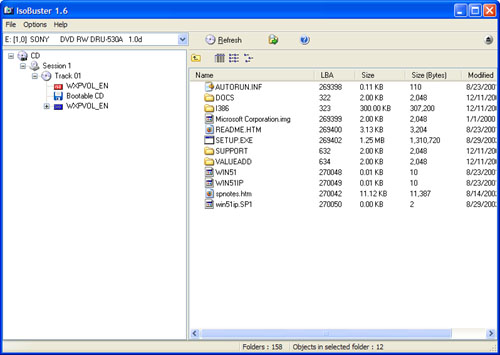
On the left-side tree view, make sure you have selected the node named Bootable CD. You should see a file called Microsoft Corporation.img (or similar; it will be named something.img) in the right side of ISOBuster. This is the file you need to extract. To do so, right-click and choose Extract Microsoft Corporation.img. When ISOBuster prompts you, choose to download it to the root of your C: drive. Now you can close ISOBuster.
Step 5: Make a bootable XP SP2 CD
Start My Computer and make a note of the name of your Windows XP CD (my CD happens to be named WXPVOL_EN because it's a volume licensed version of XP Pro, but yours will likely be different). Then, eject the XP CD and place a burnable CD (CD-R or CD-RW) in your CD burner, and dismiss any autorun dialog boxes XP might display.
Now, you're ready to burn your new, bootable Windows XP SP2 CD. How you do this will depend on the CD writing software you use. In this section, I'll examine Nero Burning ROM 6 and versions 5 and 6 of Roxio Easy CD/Media Creator. Please note, however, that the latest version of Easy Media Creator, version 7, will not work. I'm looking into workarounds.
Step 5a: Make a bootable XP SP2 CD with Nero Burning ROM 6
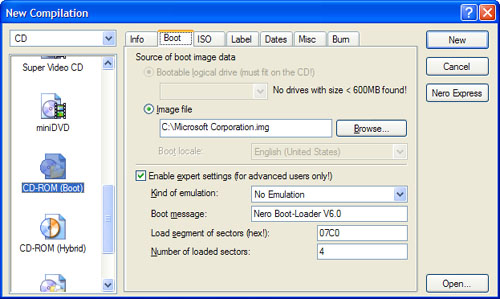
First, start Nero Burning ROM and choose CD-ROM (Boot) from the New Compilation's Boot page. Then, under "Source of boot image data," choose "Image file" and select C:\Microsoft Corporation.img by clicking the Browse button. Then, select the option titled "Enable expert settings (for advanced users only)" and change "Kind of emulation" to No Emulation, and change "Number of loaded sectors" to 4. The "Load segment of sectors" option should remain at its default value of 07C0. When this step is completed, the Nero Burning ROM application should resemble the following:
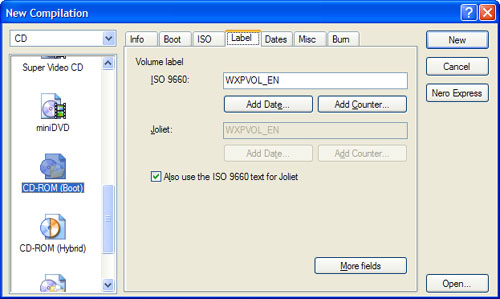
Now, select the Label page in Nero Burning ROM. Under "Volume label, ISO 9660" enter the name of your CD (WXPVOL_EN in my case). When completed, this page of the dialog should resemble the following:
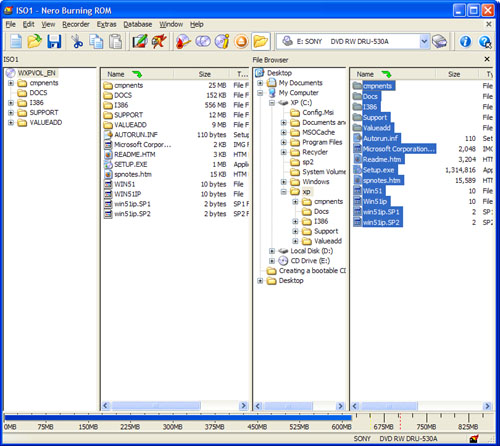
Now, click the New button. The New Compilation dialog disappears and the main window of Nero Burning ROM is available, as shown here.
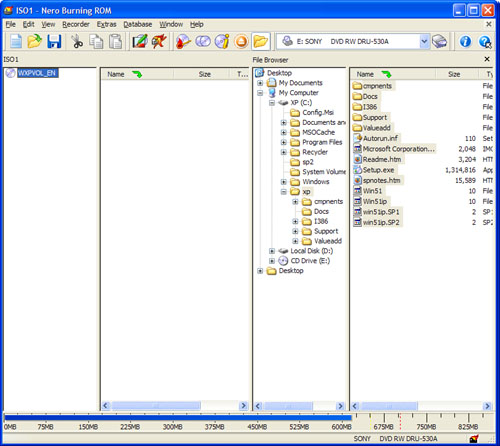
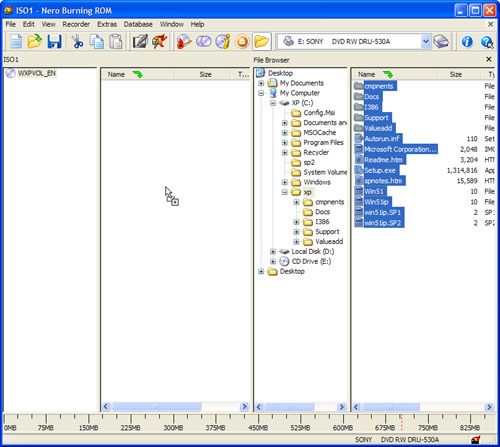
On the right side of the application, in the File Browser area, navigate to C:\xp. Then, select all of the files inside of that directory and copy them over to the new CD, as shown here:
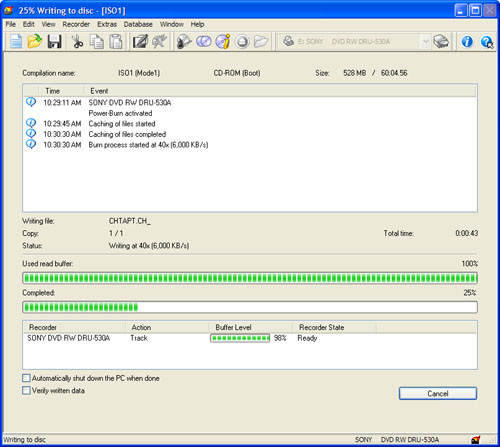
Now you're ready to burn the CD. Click the Burn icon in the toolbar, or choose Recorder and then Burn Compilation, and then click the Burn button. Nero will cache the files and then write them to disc, as shown here:
Step 6: Test it
Once the CD is created, you should test it on a non-critical system or in a virtual machine such as those used by Microsoft Virtual PC and VMWare Workstation. Depending on the environment you choose, the CD should either boot automatically, or you will see a note asking you to press any key to install. Use the CD to install Windows XP with SP2 to make sure it's working correctly. Most important, perhaps, ensure that the version of XP you've installed is SP2. To do so, go to Start, then Run, and type "winver" (no quotes) and hit ENTER. The SP2 version number is 5.1 (Build 2600.xpsp_sp2_rtm.040803-2158: Service Pack 2).
When you're done testing, you should consider backing up the newly created CD, and deleting the cruft you've added to your hard drive, specifically C:\Microsoft Corporation.img, and the directories C:\xp and C:\sp2.
--Paul Thurrott
August 9, 2004
Updated August 18, 2004; August 24, 2004; August 26, 2004